Table of Contents
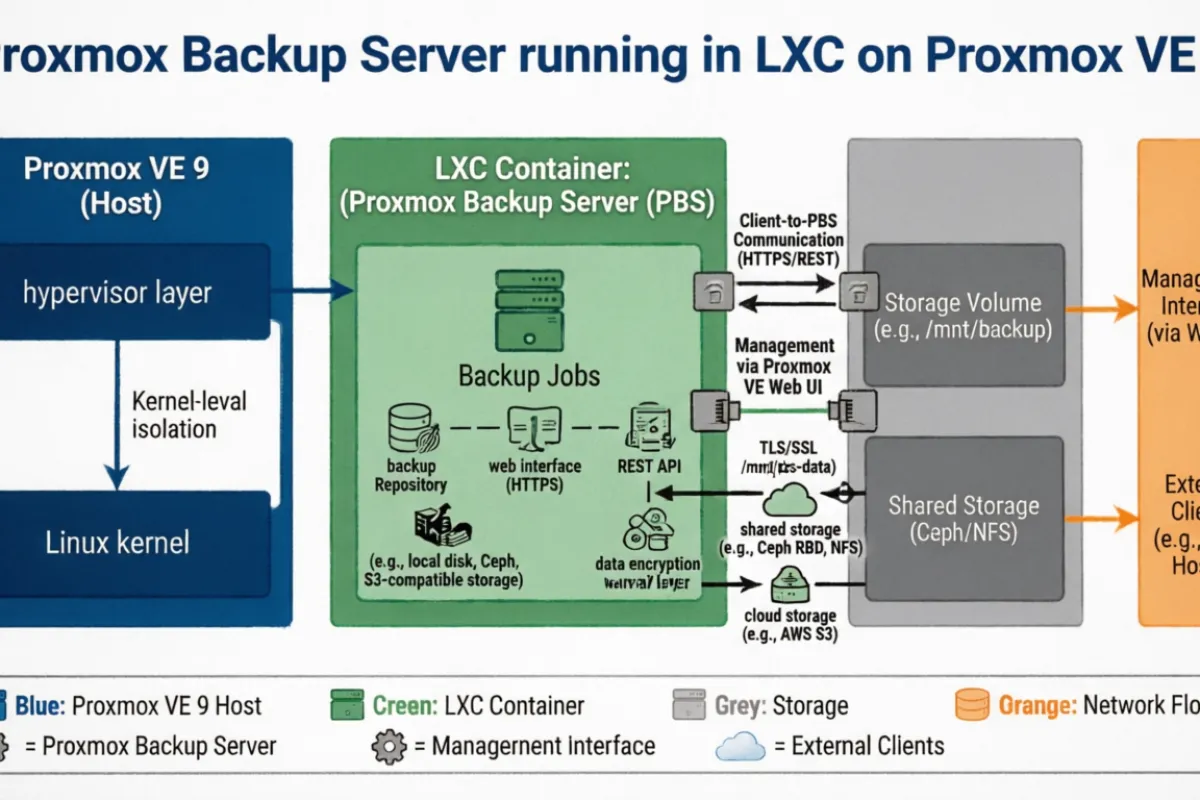
Setting Up Proxmox Backup Server in an LXC Container on Proxmox VE 9
Running out of local backup space on your Proxmox node? Here's how I set up a dedicated Proxmox Backup Server (PBS) inside an LXC container on a remote Proxmox node — solving the "I can only keep 1 snapshot" problem with deduplicated, incremental backups.
The Problem
My primary Proxmox node had limited local storage — barely enough for a single VM snapshot. I needed a way to offload backups to a second server with plenty of disk space, while keeping things efficient and manageable.
Why PBS Over NFS or Rsync?
PBS isn't just a dumb file store. It gives you:
- Chunk-level deduplication — identical blocks across VMs and snapshots are stored only once
- Incremental backups — only changed chunks get transferred after the first full backup
- Built-in verification — ensures backup integrity without restoring
- Encryption support — client-side encryption if you need it
- Garbage collection — automatically cleans up orphaned chunks
An NFS mount or rsync cron would work, but you'd be storing full vzdump archives with no dedup. PBS can hold significantly more snapshots in the same disk space.
Why an LXC Container?
My second Proxmox node (proxmox2) runs PVE 9.1.5, which is based on Debian Trixie. The PBS packages are built against Debian Bookworm, so installing PBS directly on the host fails with dependency conflicts:
proxmox-backup-server : Depends: libsgutils2-1.46-2 (>= 1.43) but it is not installable
                        Depends: libapt-pkg6.0 (>= 1.9~) but it is not installable
The fix: spin up a Debian 12 (Bookworm) LXC container and install PBS inside it. It's lightweight, isolated, and avoids polluting the host with incompatible packages.
Step 1: Download the Debian 12 Template
pveam update
pveam available | grep debian-12
pveam download local debian-12-standard_12.12-1_amd64.tar.zst
Step 2: Create the LXC Container
Key settings for the container:
| Setting | Value | Notes |
|---|---|---|
| CT ID | 102 | Any free ID |
| Hostname | BackupServer | |
| Unprivileged | No (unchecked) | PBS needs privileged access for disk ops |
| Nesting | Yes | |
| Template | debian-12-standard | Bookworm base |
| Storage | data_sdc | Use your large disk — mine has 4TB |
| Disk Size | 1024 GiB | PBS OS + datastore live here |
| CPU | 2 cores | PBS is I/O bound, not CPU heavy |
| Memory | 4096 MB | 2GB is minimum, 4GB is comfortable |
| Network | Static IP | 192.168.0.24/24, GW 192.168.0.1 |
| DNS | 8.8.8.8 | Or your preferred DNS server |
You can create it from the GUI or CLI:
pct create 102 local:vztmpl/debian-12-standard_12.12-1_amd64.tar.zst \
  --hostname BackupServer \
  --memory 4096 \
  --cores 2 \
  --rootfs data_sdc:1024 \
  --net0 name=eth0,bridge=vmbr0,ip=192.168.0.24/24,gw=192.168.0.1 \
  --nameserver 8.8.8.8 \
  --unprivileged 0 \
  --features nesting=1
Start and enter the container:
pct start 102
pct enter 102
Step 3: Install PBS Inside the Container
echo "deb http://download.proxmox.com/debian/pbs bookworm pbs-no-subscription" > /etc/apt/sources.list.d/pbs.list

wget https://enterprise.proxmox.com/debian/proxmox-release-bookworm.gpg -O /etc/apt/trusted.gpg.d/proxmox-release-bookworm.gpg

apt update && apt install proxmox-backup-server -y
This installs cleanly since the container runs Bookworm — no dependency conflicts.
Step 4: Create a Datastore
Create the directory for backup data:
mkdir -p /backup Then access the PBS web UI at https://192.168.0.24:8007 and log in with root and the container's root password.
Go to Datastore → Add Datastore:
- Name:
store1 - Backing Path:
/backup - GC Schedule: daily
- Prune Schedule: daily
Step 5: Connect Your Proxmox Node to PBS
Grab the PBS certificate fingerprint:
proxmox-backup-manager cert info | grep Fingerprint On your main Proxmox node, go to Datacenter → Storage → Add → Proxmox Backup Server:
- ID:
pbs-backup - Server:
192.168.0.24 - Username:
root@pam - Password: container root password
- Datastore:
store1 - Fingerprint: paste the SHA-256 fingerprint
Hit Add. The storage should appear in your storage list.
Step 6: Create a Backup Job
Go to Datacenter → Backup → Add on your main node:
- Storage:
pbs-backup - Schedule: pick your preferred time (off-peak hours recommended, e.g., 2:00 AM)
- Selection mode: choose which VMs to back up
- Mode: Snapshot (for VMs) or Stop (for containers if you need consistency)
- Retention: configure keep-daily, keep-weekly, etc.
Understanding PBS Backup Format
If you browse the datastore on disk, you won't see familiar .vma or .tar.gz files. PBS uses a chunked format:
/backup/vm/102/2026-02-12T17:59:47Z/
├── client.log.blob          # Backup log
├── drive-scsi0.img.fidx     # VM disk (chunked fixed-index)
├── index.json.blob          # Backup metadata
└── qemu-server.conf.blob    # VM configuration
The actual data lives in /backup/.chunks/ — a shared directory where deduplicated blocks are stored. Running du -sh on individual backup directories shows tiny sizes because they're just index files pointing to shared chunks.
To see real usage:
proxmox-backup-manager datastore list Or check the PBS UI dashboard for total usage, dedup ratio, and chunk statistics.
Performance Considerations
Since this PBS container runs alongside other VMs on the same node:
- Schedule backups during off-peak hours to avoid I/O contention
- The datastore ideally lives on a separate physical disk from your VM storage
- PBS dedup and GC are CPU-light — brief spikes during garbage collection won't impact other workloads
Restoring from PBS
Restoring is straightforward from the Proxmox VE GUI. Select any VM → Backup tab → choose the PBS backup → Restore. PBS handles reassembling the chunks transparently.
From CLI:
qmrestore pbs-backup:backup/vm/102/2026-02-12T17:59:47Z 102 Wrapping Up
PBS in an LXC container is a clean solution when you can't install PBS directly on a Trixie-based Proxmox host. You get all the benefits of deduplication and incremental backups with minimal resource overhead. The container uses around 2 cores and 2-4GB RAM — practically nothing on a server that's already running VMs.
The dedup alone means you can keep significantly more backup snapshots in the same disk space compared to raw vzdump files over NFS. If you're running a homelab with limited storage, this is the move.