Creating LVM on Linux: A Step By Step Guide
Introduction
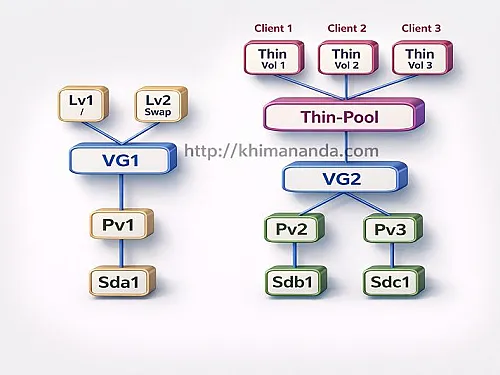
Logical Volume Manager (LVM) is one of those core technologies that DevOps folks swear by once they start using it. Instead of being limited by fixed partitions, LVM lets you pool disks together, carve out logical volumes of any size, resize them on the fly, and perform snapshotting without rebooting. On a busy server or home lab, this flexibility is priceless.
In this guide we’ll walk through setting up LVM from scratch on a Linux machine. You’ll learn how to initialize physical volumes (PVs), create a volume group (VG), carve out logical volumes (LVs), format and mount them, and even resize them later. By the end you’ll have a working LVM setup you can use for databases, virtual machines, or just a more flexible file storage.
Who This Is For
If you’re new to storage management but comfortable running commands in a shell, this tutorial is for you. We’ll assume you have root or sudo access to a Linux system and at least one unused disk or partition. We’ll use standard tools like pvcreate, vgcreate, and lvcreate that are available on most distributions.
Why Use LVM?
Before jumping into commands, it’s worth understanding why LVM exists and when it’s useful. Here are the main benefits:
- Dynamic resizing: With LVM you can grow or shrink logical volumes without rebooting. Need to expand
/homebecause you’re running out of space? Easy. - Disk pooling: LVM lets you combine multiple physical disks into a single pool. This is handy if you have a bunch of small SSDs or HDDs and want to treat them as one large storage area.
- Snapshots: You can create snapshots of a logical volume at a point in time. Snapshots are useful for backups or testing changes without risking the original data.
- Simplified management: Instead of juggling traditional partitions (e.g.,
/dev/sda1,/dev/sdb2), you manage logical volumes with descriptive names (e.g.,web_data_lv). - Flexibility for virtualization: Hypervisors like KVM and Proxmox can use LVM-backed storage to allocate disks for virtual machines, allowing fast clones and snapshots.
On the flip side, LVM adds a layer of abstraction, which means you need to monitor capacity and understand the commands. But the benefits outweigh the learning curve for most use cases.
Prerequisites
- A Linux machine with root or sudo privileges.
- At least one unused disk or partition. For this guide, we’ll assume
/dev/sdbis an empty disk. You can adapt the commands if you’re using partitions like/dev/sdb1,/dev/sdc1, etc. - The
lvm2package installed. Most modern distributions come with LVM tools pre-installed. If not, install it via your package manager (apt install lvm2on Debian/Ubuntu,yum install lvm2on CentOS/RHEL,dnf install lvm2on Fedora, etc.).
Caution: LVM operations can destroy data if applied to disks with existing filesystems. Double-check disk names before running commands.
Step 1: Prepare Disks and Install LVM Tools
First, verify that you have LVM tools available:
sudo lvm version If the command isn’t found, install the lvm2 package. On a Debian-based system, run:
sudo apt update
sudo apt install lvm2
Next, identify the disk or partition you want to use. We’ll use lsblk to list available block devices:
lsblk -f Look for an unused disk, such as /dev/sdb. Make sure it doesn’t have a mounted filesystem. If the disk has partitions and you want to reuse it, back up any important data first and consider wiping it with wipefs or dd.
Step 2: Initialize Physical Volumes (PVs)
A physical volume is the lowest layer of LVM. It’s essentially a wrapper around a disk or partition that LVM can understand. To initialize a PV on our empty disk /dev/sdb, run:
sudo pvcreate /dev/sdb You’ll see output like:
``
Physical volume “/dev/sdb” successfully created
You can verify the PV with:

```bash
sudo pvdisplay
This shows details such as PV name, size, and status. If you have multiple disks, repeat pvcreate for each one (e.g., /dev/sdc, /dev/sdd).
Step 3: Create a Volume Group (VG)
A volume group pools one or more PVs into a single storage area. You can think of a VG as a storage pool from which logical volumes will be carved.
Create a VG named vg_data using your PV:
sudo vgcreate vg_data /dev/sdb If you’re combining multiple disks, list them all:
sudo vgcreate vg_data /dev/sdb /dev/sdc /dev/sdd Check the VG details:
sudo vgdisplay vg_data You’ll see the total size and free space. The free space is what you’ll allocate to logical volumes.
Extending a Volume Group
If later you add more disks, you can extend the VG:
sudo vgextend vg_data /dev/sde Step 4: Create Logical Volumes (LVs)
Logical volumes sit on top of VGs. They are the partitions you actually use and mount. You can create as many LVs as you want as long as you have free space in the VG.
Let’s create a 50 GB LV for a database:
sudo lvcreate -L 50G -n db_lv vg_data This allocates 50 gigabytes from vg_data and names the LV db_lv. You can check the LV details with:
sudo lvdisplay /dev/vg_data/db_lv Another example: create a 100 GB LV for storing media:
sudo lvcreate -L 100G -n media_lv vg_data If you want to allocate all remaining space to a volume, use -l 100%FREE instead of -L:
sudo lvcreate -l 100%FREE -n big_lv vg_data Thin vs Thick Provisioning
By default, lvcreate uses thick provisioning (space is allocated immediately). If you want to use thin provisioning (like LVM-Thin), you’d create a thin pool and then thin volumes. For the scope of this guide, we’ll stick to classic thick LVs because they’re simpler and safer for beginners.
Step 5: Format and Mount the Logical Volume
Now that you have an LV, you need to format it with a filesystem and mount it. We’ll use ext4, but you can choose XFS, ext3, etc.
Format the LV
sudo mkfs.ext4 /dev/vg_data/db_lv Replace db_lv with the name of your LV.
Create a Mount Point
Pick a directory to mount the LV. For example, /mnt/dbdata:
sudo mkdir -p /mnt/dbdata Mount the LV
sudo mount /dev/vg_data/db_lv /mnt/dbdata After mounting, check with df -h to see the new filesystem:
df -h | grep vg_data Persist the Mount Across Reboots
Edit /etc/fstab to ensure the LV mounts automatically. Add a line like:
``
/dev/vg_data/db_lv /mnt/dbdata ext4 defaults 0 2
Save the file and test with:

```bash
sudo mount -a
If there are no errors, the mount will persist after reboot.
Step 6: Resizing Logical Volumes
One of the biggest perks of LVM is the ability to resize volumes. You can grow a volume when you need more space or shrink it if you’ve over-allocated.
Extending a Logical Volume
Let’s say your database LV (db_lv) is running out of space. If your VG has free space, you can extend the LV:
sudo lvextend -L +20G /dev/vg_data/db_lv This command adds 20 GB to db_lv. If you want to allocate all remaining free space, use:
sudo lvextend -l +100%FREE /dev/vg_data/db_lv After extending the LV, you need to grow the filesystem. For ext4, use:
sudo resize2fs /dev/vg_data/db_lv For XFS filesystems, you’d run:
sudo xfs_growfs /mnt/dbdata Shrinking a Logical Volume
Shrinking is riskier than extending because you can lose data if you don’t plan carefully. Always back up your data before shrinking. For ext4 filesystems, the process is:
- Check and unmount the filesystem
sudo umount /mnt/dbdata sudo e2fsck -f /dev/vg_data/db_lv - Resize the filesystem
sudo resize2fs /dev/vg_data/db_lv 30GReplace
30Gwith the target size. The filesystem must be shrunk before the LV. - Reduce the logical volume
sudo lvreduce -L 30G /dev/vg_data/db_lv - Remount the filesystem
sudo mount /dev/vg_data/db_lv /mnt/dbdata
Shrinking on XFS is not supported; you’d need to back up, recreate the LV, and restore data.
Step 7: Creating Snapshots
Snapshots capture the state of an LV at a specific point in time. They are useful for backups, testing, or before performing risky operations (like major upgrades).
Create a Snapshot
Assume you have a 50 GB LV and want to snapshot it. You’ll need to allocate space for the snapshot; 20 % of the original LV size is a common starting point, but adjust based on expected write load.
sudo lvcreate -L 10G -s -n db_snap /dev/vg_data/db_lv Here -s indicates a snapshot. The new LV db_snap will appear in lvdisplay and can be mounted read-only:
sudo mkdir -p /mnt/db_snap
sudo mount -o ro /dev/vg_data/db_snap /mnt/db_snap
Use the snapshot for backups or tests. When you’re done, remove it to free space:
sudo umount /mnt/db_snap
sudo lvremove /dev/vg_data/db_snap
Snapshot Caveats
- Snapshots share storage with the origin LV. If the snapshot fills up (due to heavy writes on the origin), the snapshot becomes invalid.
- For long-term backups, use dedicated backup tools instead of relying on LVM snapshots alone.
Conclusion
Setting up LVM might feel intimidating at first, but once you get the hang of it, you’ll wonder how you managed without it. By initializing physical volumes, grouping them into volume groups, creating logical volumes, and learning to resize and snapshot them, you gain a level of control over your storage that traditional partitioning can’t match.
For DevOps engineers, LVM is a gateway to more advanced storage techniques, including thin provisioning (LVM-Thin), tiered storage, and integration with virtualization platforms like Proxmox and KVM. Even in a simple home server, LVM provides resilience and flexibility.
Try experimenting with additional disks, creating multiple logical volumes for different services (databases, web content, backups), and exploring how snapshots can streamline your backup workflow. Just remember to monitor your volume group’s free space and back up critical data before experimenting with resizing operations.
Happy hacking!